![]()
How to install a video card
Initial steps which are common to all installations
System restore is your friend
Before you get started, it's a good idea to prepare for trouble. I'm not trying to scare you. It's just a good idea to be prepared for the worst. Video card installations usually go off without a hitch. But if you're the sort who likes to be careful then it's a good idea to make a system restore point before you start making any changes. A system restore point keeps track of the state of your computer's software at a given point in time. If something goes wrong with the installation then you can do the following:
- Do a system restore to return the state of your software to where it was when you made the system restore point. In this case, that's just before you started installing your new video card.
- Shut the computer off and remove the new video card.
- If you have integrated video then reconnect the monitor to the motherboard video connector. If you don't have integrated video then reinsert your old video card and connect the monitor to it.
- Boot Windows and you're back to your previous setup.
- Figure out what went wrong with the installation and try again.
Windows ME and XP both have built-in support for system restore points. You need third-party software to get this functionality in other versions of Windows. You can read more about system restores on this page. You don't need to make system restore points if you don't think it's worth the trouble. I change video cards all the time and I never do. But if you're new to installing video cards then you might as well take a minute and make a restore point. It can make it a lot easier to recover and get your machine working properly if you get into trouble.
Get administrator rights
If you're running Windows 2000 or XP, then another thing you need to do before installing your video card is make sure that you have administrator rights. If you don't know what those are, then you probably already have them. Only administrators are allowed to install and uninstall drivers and most other software. This page explains what administrator rights are and how to get them.
Disable your virus scanner
One last thing you should do before getting started with your video card installation is disable your virus scanner. Both NVIDIA and ATI tell you to disable your virus scanner before installing video drivers. I don't know how often they really interfere with driver installations. I have seen virus scanners cause problems while installing copy-protected games. In any case, as long as you're running "official" drivers downloaded from the maker of your video card (or ones which came on the installation CD) then you don't have to worry about viruses in the video driver. It's best to follow their instructions and temporarily disable your virus scanner while your changing video cards. Just remember to re-enable it once you've got your new video card up and running.
Update your motherboard chipset drivers
Your motherboard contains a CPU, some RAM, and expansion slots. But it also contains some chips which make all those parts work together. The most important of these chips are called the chipset. They are called that even if it is really only one chip. You need to have chipset drivers installed to make everything work together properly. It's a good idea to update your chipset drivers before installing a new video card. It's especially important for AGP video cards but you should do it for other kinds of video cards too. Some video card stability problems are fixed by releasing new motherboard chipset drivers. It's a good idea to make sure you have the "latest and greatest" ones installed before putting in your new video card. This page explains in detail how to download and install your chipset drivers.
Make sure you know how to avoid zapping your computer with static electicity
You're about to start working inside your computer. This is a good time to talk about static electricity. It's bad. Okay, it's probably good for some things but it's bad for computers. All you have to do to destroy a silicon chip is shuffle your shoes across a carpet and then touch a chip inside your computer. That blows a tiny little hole (it looks like the Grand Canyon on an electron microscope image) inside the chip. And if the humidity is low then you don't even have to shuffle your feet. Some of the chips in your computer are very sensitive to static electricity so you need to be very careful when working in there.
This is where we get to talk about grounding and you need to consider whether your house was wired by a complete idiot. The power cable which plugs into the wall has three wires. We only care about the ground wire. (It's also called the earth wire or the earth ground wire). The ground wire is connected to the metal case of your power supply and to the metal parts of the computer case. You can discharge static electricity by touching any bare metal part of your case because it's discharging the static to ground. If your house was wired properly then touching ground is perfectly safe. You're touching ground whenever you walk barefoot outdoors. That's not a joke. Your house's ground wires are probably connected to a metal rod stuck into the ground. But if your house was wired by a complete fool who ignored the rules then you might get a jolt when you touch ground. Note that it would have to be the world's dumbest electrician and you'd probably already be getting lots of jolts if it was wired that way. If there's some possibility that your electrician was an idiot (while wiring that room was he wearing a drool bib with the word "stupid" and an arrow pointing upwards?) then you'd be better off unplugging the power cord from either the wall or the power supply. That way your case is not connected to the possibly miswired earth ground. If your house is properly wired then it's better to leave the power cable plugged in while working. But if you're not sure about your wiring (or you're just paranoid) then unplugging the power cord will keep you from getting any jolts. But still be sure to touch bare metal parts of the case to discharge any built-up static electricity.
While working, you need to make sure to regularly discharge any static electricity. If you're a complete electronics geek (or you're a stickler for following instructions) then you may already own an anti-static wrist strap. I've designed electronics and worked with computers for thirty years and I don't have one so don't feel bad if you haven't got one either (it's really just a 1 megaohm resistor, a wire, and an alligator clip). If you have one then put it on and clip it to a bare metal part of the case. That will make sure that you won't zap your chips. For the rest of you (and me), all you have to do is touch your finger to any bare metal part of the case to discharge any static. Some power supplies have paint jobs which act as an insulator so they're sometimes not the right part to touch. Just touch an exposed metal part of the case. Touch the case every couple of minutes and you'll have no problems. If you want to be extra careful then work barefoot. That prevents you from building up much of a static charge in the first place.
When dealing with expansion cards, it's best to handle them only by the edges or by the rear metal bracket. Try not to touch anything but the edges of the circuit board. That helps you avoid touching the silicon chips. If you're following the rules about discharging static electricity then touching the chips probably won't hurt them but you might as well play it safe and avoid touching them at all. Video cards usually come in special anti-static plastic bags. They are usually brown or silver. Those bags help keep it from getting zapped by static electricity. When swapping video cards, you can store the old video card in the bag which came with the new one. If you don't have an anti-static bag then you can actually wrap it in tin foil. It looks a little silly but accomplishes the same thing.
Installation cases
The steps to properly install a video card can vary depending on the situation. The various different cases are listed below. Just figure out which of the following cases apply to you and then follow the list of steps for that case. The steps in each list must be done in order. The underlined steps are links to thorough explanations of how to do them.
Installation case 1: you're removing your old video card and installing a new one
This is the simplest case. Basically, you uninstall your old display drivers, remove the old video card, insert the new video card, and then install your new display drivers.
- Uninstall your old display drivers.
- Turn your machine off.
- Open your case to get access to the expansion slots.
- Remove your old video card from its expansion slot.
- Insert your new video card into an expansion slot.
- Connect the monitor to your new video card.
- Turn your machine on and boot Windows.
- Install the display drivers for your new video card.
Installation case 2: you're adding a new AGP or PCI-Express x16 video card to a motherboard with integrated video and your monitor will be hooked to the new video card
This is how you upgrade the video system in most store-bought computers. Unfortunately, this case can be anywhere from simple to extremely difficult depending on the computer. Let's just be optimistic and list the steps for the simplest case.
- Turn your machine off.
- Open your case to get access to the expansion slots.
- Insert your new video card into an expansion slot.
- Connect the monitor to your new video card.
- Turn your machine on and boot Windows.
- Install the display drivers for your new video card.
In a perfect world, the steps listed above would always work when adding a video card to a machine with integrated video. In fact, these steps usually do work. Unfortunately, there's no standard way to add a video card to a computer with integrated video. You can always try calling the manufacturer of the computer to see if they can explain the steps (it's a question they must get a lot) but I've seen lots of cases where they just have a generic set of steps which often don't work. It's worth calling anyway to see if they can help. Computer manufacturers often have Internet help forums where people can ask questions. They often have a frequently asked questions list which you can check. If you can't get any useful information from the manufacturer (a common case), then you can try to come up with a series of steps appropriate for your computer.
In many computers with integrated video, installing a video card into an AGP slot or a PCI-Express x16 slot automatically disables the integrated video. You don't need to uninstall or disable the integrated video's display driver because it is automatically disabled the next time Windows boots. This kind of computer is the most common and the steps listed above should do the job.
Some newer computers allow you to hook one monitor to your integrated video and another monitor to an AGP or PCI-Express x16 video card. That's handy for people who want to run multiple monitors simultaneously. That kind of computer doesn't automatically disable the integrated video when you install a new AGP or PCI-Express x16 video card. The problem with that kind of setup is that you have to tell the computer which of the two video systems is your primary video display. The primary video display is where the BIOS and powerup screens appear. It's also the main monitor in Windows where the taskbar and icons appear. The secondary video display can be set up as extra desktop space. Some people want the primary video display to be their integrated video while other people want it to be their new video card. Most computers are set up assuming that any video card you install is the primary video display and your integrated video becomes the secondary video display. But some computers are set up the other way. So for this kind of computer, installing a new video card is a little more complicated:
- Start your computer up and go into the BIOS. Set the primary video display option in the BIOS to the kind of slot used by your new video card.
- Turn your machine off.
- Open your case to get access to the expansion slots.
- Insert your new video card into an expansion slot.
- Connect the monitor to your new video card.
- Boot your machine.
- Install the display drivers for your new video card.
If you don't plan to use your integrated video at all it would be nice to make it completely disappear. Integrated video borrows its video RAM from motherboard RAM. If you're not using your integrated video then the RAM it borrows from the motherboard is wasted. Disabling your integrated video also reduces the likelihood of some kind of conflict between your old and new video systems. The steps to do it are listed below.
- Uninstall your old display drivers.
- Turn your machine off.
- Turn your machine back on and go into the BIOS. Find the BIOS option which disables the integrated video. It's usually in the integrated peripherals section. Set the BIOS option to disable the integrated video. Exit and save from the BIOS.
- Turn your machine off.
- Open your case to get access to the expansion slots.
- Insert your new video card into an expansion slot.
- Connect the monitor to your new video card.
- Turn your machine on and boot Windows.
- Install the display drivers for your new video card.
The steps above make the integrated video completely vanish from the computer. Unfortunately, many motherboards do not allow you to disable the integrated video. If your computer can disable the integrated video then the steps listed above are the best ones to use. You can tell if your machine can disable the integrated video by looking for that option in the BIOS. If you don't know much about BIOSes then this page shows you the basics. If your BIOS can disable the integrated video then use the steps listed above.
If your new video card doesn't work then you've got a problem. You just disabled your integrated video in the BIOS. If you hook a monitor to it, nothing shows up on the screen. You can't use it to go into the BIOS and re-enable the integrated video. The solution to this problem is to clear the CMOS RAM. That resets the BIOS options for the motherboard to their default states which includes enabling the integrated video. That means that your integrated video will start working again. If you had any other BIOS options set up then you'll have to do them over again because clearing your CMOS RAM resets all of them to defaults: not just the ones for the integrated video. The manual for your computer should explain how to clear the CMOS RAM. If not, you can find the information on the manufacturer's web site for your computer model. For example, this page explains how to do it for a Dell Dimension 8400. Generally it involves finding a jumper (a small gizmo which operates like a switch) on the motherboard and moving the jumper temporarily to the clear position and then back to its normal position again. On some motherboards, you clear the CMOS by unplugging the power supply and removing the lithium coin cell battery (the flat circular battery shown in this picture to the right of the red asterisk) for a few minutes and then putting the battery back in and turning the machine on.
If your machine can't disable the integrated video then you may be able to just disable the display driver. The list below will prevent Windows from trying to reload display drivers for your integrated video the next time it boots. It also avoids the occasional resource conflicts between your new video card and your old integrated video.
- Disable the display drivers for your integrated video.
- Turn your machine off.
- Start your computer up and go into the BIOS. Set the primary video display option in the BIOS to the kind of slot used by your new video card.
- Turn your machine off.
- Open your case to get access to the expansion slots.
- Insert your new video card into an expansion slot.
- Connect the monitor to your new video card.
- Turn your machine on and boot Windows.
- Install the display drivers for your new video card.
So basically, I've given you four separate lists of steps. So which one should you use? If your computer can disable the integrated video in the BIOS then you should try this list. If your computer can't disable integrated video or you have no idea which list to try then I'd try this one. If you're having serious problems then you can set a system restore point as described earlier and just try all four lists to see if any work.
Installation case 3: you're adding a new PCI video card to a motherboard with integrated video and your monitor will be hooked to the PCI video card
This case is similar to installation case 2 but there are some differences so read through it before continuing here. This case can be different because installing a PCI video card never automatically disables the integrated video. Almost all computers allow you to select a PCI video card as the primary video display. But sometimes this kind of upgrade is not possible because some older computers don't allow you to tell the motherboard that the PCI video card is your primary video display. That kind of motherboard always uses the integrated video as its primary video display. Compaq was especially notorious for shipping that kind of computer.
If your computer can disable the integrated video in the BIOS then I'd try try this list first. If it can't be disabled then try this one. Some manufactures have acquired a very bad reputation when it comes to adding PCI video cards to older computers. If you have an old Dell computer, then take a look at this message. It may show you the arcane series of steps needed to get it to work.
Installation case 4: you're adding a new video card to a motherboard with integrated video and you will have one monitor connected to the integrated video and another monitor connected to the new video card
Many motherboards automatically disable the integrated video when you add an AGP or PCI-Express x16 video card. If you have one of those motherboards then you can't have monitors connected to both the integrated video and a new video card at the same time. You can only run one or the other. As long as your motherboard can run both simultaneously, then the only extra step you need for installing your new video card is telling the BIOS which is your primary video display. That's going to be the monitor which displays the powerup and BIOS screens. It will also be the main monitor in Windows which contains the taskbar and icons.
- Start your computer up and go into the BIOS. Set the primary video display option in the BIOS to whichever video system is supposed to be your primary video display.
- Turn your machine off.
- Open your case to get access to the expansion slots.
- Insert your new video card into an expansion slot.
- Connect a monitor to your integrated video.
- Connect a monitor to your new video card.
- Boot your machine.
- Install the display drivers for your new video card.
Installation case 5: you're adding a new video card and continuing to use your existing video card with one monitor connected to each card
This is the case for running two video cards with two monitors. I'm not going to go into how to hook up SLI or CrossFire systems for gamers. You can get more thorough information on how to do that from the user guide which comes with your video cards. This case is just for people who are running two separate video cards at the same time.
My experience has been that Windows can get seriously confused about which video card is the primary video display. That's the one which displays the BIOS and powerup screens as well as the taskbar and icons when in Windows. The solution which normally works for me is to first uninstall all display drivers currently in the system. Then shut the machine down and remove everything except the video card which you want as your primary video display. You go through the installation process and install the latest display drivers with only the primary video display in the computer. Once that's done, then you add the next video card. That approach has saved me a lot of grief in the past. Installing both video cards at the same time seems to be what causes problems. Sometimes it works and sometimes it doesn't. Doing the primary video display first and then adding the secondary display seems to avoid the problem.
You may have to tell the BIOS which video card is your primary video display. If you're installing two PCI cards then the one closest to the top of the motherboard (if it's in a vertical case) is normally the primary video display. If you're installing one PCI card along with an AGP or PCI-Express x16 video card then you'll have to tell the BIOS which one is the primary video display.
Both the Radeon and GeForce display drivers support a wide range of video cards. When you're running two Radeons or two Geforces, you only install the display driver once. That's true even if they are two very different models. It will automatically create separate instances of the display driver for each card.
- Uninstall all of your old display drivers.
- Turn your machine off.
- Start your computer up and go into the BIOS. Set the primary video display option in the BIOS to whichever video system is supposed to be your primary video display.
- Turn your machine off.
- Open your case to get access to the expansion slots.
- Remove any old video cards.
- Insert your primary video card into its expansion slot.
- Connect the monitor to your primary video card.
- Turn your machine on and boot Windows.
- Install the display drivers for your primary video card.
- Turn your machine off.
- Insert your secondary video card into its expansion slot.
- Connect the monitor to your secondary video card.
- Turn your machine on and boot Windows.
- If your secondary video card can use the same display driver as your primary video card (they're both Radeons or they're both GeForces), then you're done. If your secondary video card needs a different display driver than your primary video card, then Install the display drivers for the secondary video card.
Installation steps
These steps are in no particular order. To use these steps, go to the installation cases section and select which case applies to your situation. Each case contains a list which links to the appropriate steps below.
Uninstall your old display drivers
It's always a good idea to uninstall your old display drivers before installing new ones. The display drivers for most brands of video cards actually support a wide range of video card models. As a result, if you are switching from one video card to another which uses the same brand of GPU (for example, you're switching from one NVIDIA card to another NVIDIA card), you can often get away with swapping video cards without updating the display driver. Obviously, if you're changing from an ATI card to an NVIDIA card, or vice versa, then you're going to need to install a new display driver. Most of the time, you can also get away with installing a newer version of a given brand of display driver without first uninstalling the older version. Don't do it! You can cause some very subtle problems by installing new drivers over older ones because vestiges of the old driver may still be hanging around in your system. The intelligent way to do things is to be thorough and do it properly. Always uninstall your old display driver before installing a new one. It takes a couple of extra minutes but it's worth the extra effort. This page gives thorough instructions on how to uninstall your display drivers.
Disable your old display drivers
If you have integrated video hardware enabled in your computer then Windows makes sure that a display driver is installed. If you uninstall the display driver then Windows will try to reinstall the driver the next time it reboots. It can get really annoying. You uninstall the drivers and then Windows reinstalls them. If you disable the integrated video hardware then Windows will stop trying to reinstall the display drivers. But if you have to leave the video hardware enabled (lots of computers can't disable it) then Windows will always try to make sure that a display driver is installed. One solution to this little problem is to disable the display driver rather than uninstall it. Windows 2000 and XP usually allow you to disable the display driver. I say "usually" because sometimes it won't allow it. I'm not sure how Windows decides. You can give it a try and find out.

The screenshot above shows what it looks like when it's willing to let you disable a display adapter. You need to go into the Device Manager (double-click the Control Panel, double-click System, select the Hardware tab, click Device Manager, click the "+" to the left of Display Adapters to open the list of video cards). Then right-click the display adapter and select "Disable". You'll then have to reboot and it's disabled. Windows won't try to reinstall the drivers the next time you reboot. They're already installed but are disabled. If you want to re-enable the driver then go through the same steps as before but select "Enable" rather than "Disable".
Set the primary video display in the BIOS
Windows can support computers with more than one monitor. One monitor is your primary display. It contains the Windows taskbar, the program icons, and it's where most programs open up by default. Your system powerup and BIOS screens always appear on the primary display. You can have other monitors to give you extra screen space. Most of the time you only have one video system in the computer so you there's no confusion which is the primary display. But if there's more than one video system in the computer then there has to be a way to specify which one is the primary display. You do it by setting a menu item in the BIOS. This page explains the basics on how to enter and navigate a motherboard BIOS.

The two images above show what the option looks like for two different BIOSes. Unfortunately, there's no standard terminology for BIOS options. The option for the left one is "Graphic Adapter Priority". For the right one it's "Init Display First". Other common names are "Init VGA first", "Primary VGA display", and "Primary graphics adapter". The option choice which you select becomes the primary video display. Those choices should be something like "PCI", "AGP", "PCI-Express", or "onboard video". Some BIOSes will list the display order priority: "AGP/PCI" means AGP is the primary display, "PCI/AGP" means PCI is the primary display. Some BIOSes have a confusing choice called "Auto". You can tell what that means by checking the other choices. If you have a motherboard with integrated video and its choices are "Auto" and "PCI", then "Auto" means that integrated video is the primary display and "PCI" means that a PCI video card is the primary display. If there's only one video system in your computer then it is always your primary display and the value of this BIOS option is ignored. Once you've set the option, you must exit the BIOS and save the settings.
Open your case to get access to the expansion slots
Case designers seem to be thinking one of two things when designing a case: "allow these clever computer users to have easy access to the inside of their computer", or "keep these stupid computer users from getting inside of my computer and screwing it up". Just pray your case was designed by someone from the easy-to-open school of thought. Those cases have an obvious method which opens them. If it's not obvious then you probably have a difficult-to-open case. For those you'll need to find either the case documentation or an x-ray machine. If you can't find the documentation then check the manufacturer's website for your computer model. They usually have diagrams which explain how to get into your computer. The table below contains links to where to start for some large computer manufacturers.
| Computer Brand | Start Searching Here |
|---|---|
| Hewlett-Packard | start here |
| Compaq | start here |
| Gateway | start here |
| Dell (USA) | start here |
| Sony | start here |
If you're not sure how to open a case, there are some examples shown below which will give you some idea of what to try and what not to try. Getting the case documentation is the best choice. But if that's not available then you'll just have to figure it out.

The case on the left can be opened by pulling the latch aimed at by the green arrow. That's the sort of thing you find with an easy-to-open case. There's a nice, convenient latch just asking to be pulled. Once you pull the latch you can remove the door and get access to the inside of the machine. When people are having problems opening a case they often start removing screws that they should leave alone. The bottom image shows you some screws aimed at by red arrows. Those screws hold the power supply to the case. Most cases have four power supply screws. Don't remove them unless you'd like to have your power supply rattling around inside your case.
The antique case in the middle (note the 5.25 inch floppy drive) has a couple of thumbscrews on the back aimed at by green arrows. You can see a closeup of a thumbscrew in the bottom image. You open this kind of case by unscrewing the thumbscrews (there may be more than two) and then lifting the metal cover off of the case.
The case on the right is a low-profile case sold by a large computer manufacturer. I think this one was designed by Rubik. Apparently, he felt that the cube was too easy to solve so he designed this thing (Well, that's what I heard anyway). The first thing most people try is to remove the thumbscrew in the back. In this particular case, the thumbscrew actually holds down the expansion cards and doesn't open the case (that Rubik guy is tricky!). This is a good example of the hard-to-open school of thought. There's no obvious way to open the case. Usually there's a panel which has to be pushed or something which needs to be squeezed or pryed before you can pop the thing apart. This is when you definitely need the documentation. For this particular case, you have to push the "magic panel" aimed at by the green arrow towards the back of the case. Then you can pop off the side panel.
Remove your video card from its expansion slot
Before removing the video card, make sure the computer is fully turned off. That sounds obvious but it's actually not as simple as you may think. Modern computers use an ATX power supply. When you press the power button on the front of the case or shut the computer off from Windows, the computer appears to turn off. But an ATX computer isn't really fully off. It just looks like it. Most of the power shuts down but an ATX power supply is still generating a standby voltage which powers parts of the motherboard. You can usually fiddle around inside a computer with only the standby power running but it's not a good idea. It's better to turn the computer fully off. Many motherboards have an LED which is lit whenever standby power is applied to the motherboard to remind you that it's not really off. The way to turn it completely off is to use the power switch on the back of the power supply. Most power supply switches have a "1" for on and a "0" for off. Switch it to off (0). Then wait a minute or press the power button on the front of the case if you're in a rush. That will turn the power completely off. Some power supplies don't have a power switch on the back in which case your only option is to unplug the power cord. It's better to leave it plugged in so your case is connected to earth ground but you only have that option if the power supply has a switch.

Now make sure you keep your static discharged as described earlier. For most of you that means touch a bare metal part of the case with your finger. Locate your video card. If you're not sure which one it is then trace the cable from your monitor to the video card. Unplug the monitor cable from the video card. You may have to unscrew a couple of bolts on either side of the monitor cable before you can remove it. Some people screw them in to keep the monitor cable from accidently popping out of the video card. Most cases hold the video card into the case with a single screw. The red arrow points to it in the image above. Unscrew it if you have one. Some cases don't use screws. Instead, they have a retention arm which holds the expansion cards in place. There's usually a lever which allows you to move the retention arm and get at the expansion cards. Consult the documentation for your computer if it's not obvious how to do it.

Now you have access to the top of the video card but don't remove it yet. You've got to check for retention mechanisms. Most AGP and PCI-Express x16 slots have them. You have to unlatch them before you can remove the video card. They're designed to keep your video card from popping out of its expansion slot during shipping. Some of them also help push the video card out of the expansion slot when unlatched. They're always at the front of the expansion slot. Some video card slots don't have a retention mechanism. If you have one then you'll need to unlatch it. Some of them twist. Some slide. Some rotate. They tend to vary quite a bit so you'll need to look carefully to figure out what type you've got.

The most common retention mechanisms have little levers which need to be pushed towards the motherboard to release the video card. The image on the left shows the position of the latch when a video card is latched into it. You have to push the lever towards the motherboard to unlatch the card. The image on the right shows it in the unlatched position. Once it's unlatched you're ready to remove the video card.
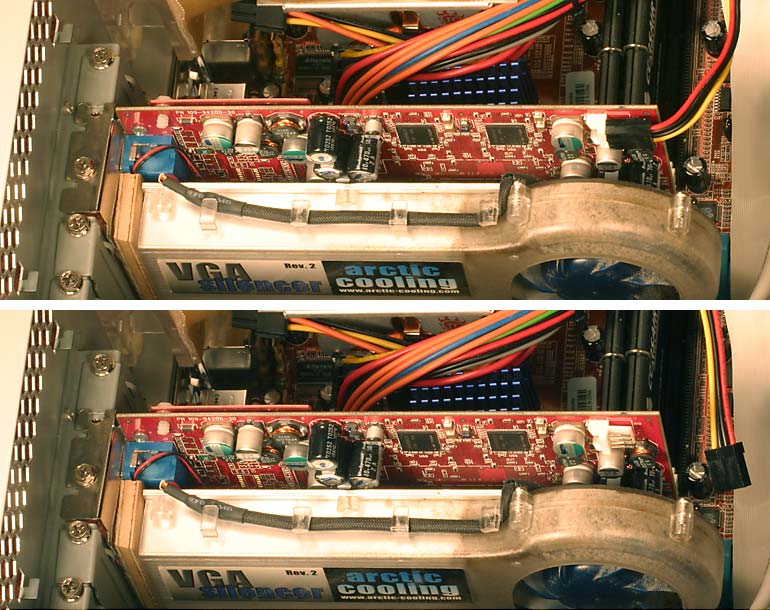
Before you remove the video card you have to look for auxiliary power cables. Some video cards use too much power to get it from the expansion slot so they need an auxiliary power cable. Unplug any auxiliary power cables from the video card. The video card shown above uses a floppy cable. Some video cards also use 4 pin peripheral cables or 6 Pin PCI-Express cables. Some high-end video cards even need two auxiliary power cables. The cables usually connect near the front of the video card like the one shown above.

The expansion slots which hold video cards are often very tight which makes it difficult to remove the card. The easiest way to remove cards is to move the front of the expansion card upwards a little and then move the rear up a little. Then go back and forth alternating between front and rear until it comes out. That minimizes the stress on both the video card and the motherboard. Try to avoid touching anything other than the edges of the video card or by the rear metal bracket. Some retention mechanisms will push the front of the video card up a little when you release the mechanism. If not, then you can start the video card moving upwards by sticking a finger below the front of the video card and pulling up a little. Be careful not to bend any components on either the video card or the motherboard while doing this. There's lots of little electronics thingies sticking up from both (mostly electrolytic capacitors) and they don't like being pushed. The rear of the video card can be started upwards by sticking a finger underneath the rear of the card and pulling. Or you can push upwards on the video connector sticking out the back of the video card. It may take quite a bit of force to get a video card moving but they come out very easily once they've moved up a little. If you have to pull hard then hold the top of the card with your other hand to make sure the card doesn't come flying out. Just be careful. Video cards and motherboards are not built like tanks. Once the expansion card is out put it into an anti-static bag if you have one. If you're installing a new video card then you can use the one which it came in.
Insert your video card into an expansion slot
First you need to pick your expansion slot. This motherboard picture shows what the various slots look like. If you're installing an AGP card then it's easy because there's only one AGP slot on a motherboard. If you're installing a PCI card then there are probably a few to choose from. There are slight differences between PCI slots (they use different interrupts) but the video card should work in any of them. Most PCI-Express motherboards only have one PCI-Express x16 slot but some gamer-oriented motherboards have two. If you have one of those dual PCI-Express x16 motherboards then you should consult your documentation on how to install the video card. There are usually restrictions on which slot to use if you only have one video card. If you're installing two video cards (for SLI or CrossFire ) then you'll probably have to move some small circuit boards or jumpers around on the motherboard before installing the video cards. The motherboard and video card documentation will explain how to do it.

This is a good time to discharge static electricity by touching some bare metal in the case. If the slot you've chosen isn't currently in use then there's probably a blank rear metal bracket that needs to be removed. The image on the left shows a couple of blank rear metal brackets. They're in empty slots to reduce the amount of electrical noise escaping from your case. If your case uses screws to hold in expansion cards then you'll need to remove the screw (pointed at by the red arrow in this image). If your case uses a retention arm to hold in expansion cards then move the retention arm out of the way. The retention arms vary from case to case so check the manufacturers case documentation if it isn't obvious how to move it. The arms usually clamp down on top of the rear metal brackets. Remove the blank rear metal bracket and be sure not to lose the screw if you have one.

If your expansion slot has a retention mechanism then you may have to fiddle with it before pushing the video card into the slot. You'll have to take a careful look and see what kind of retention mechanism you have and get it prepared if necessary. The most common kind of retention mechanism has a little lever which has to be pushed towards the motherboard before inserting the video card. You have to push the lever until it's in the position shown in the image on the right.

Take the video card and align it just above the expansion slot. Remember to handle the card by its edges or the rear metal bracket. The rear metal bracket on the video card has a small tab at its bottom. That tab has to fit into a matching hole in the baseplate beneath the motherboard shown in the image above with a green arrow. If the tab doesn't line up with the hole then you can't push the video card down. It's often a tight fit so you may have to shift the video card around a little before it fits. Once everything's lined up and any retention mechanism is prepared, push down on the top of the circuit board. You can use a couple of fingers to push down on the top of the rear metal bracket and use your other hand to push down on the top of the circuit board towards the front of the card.
Every now and then I come across a case, motherboard, and video card combination which absolutely refuses to fit together. The motherboard slot and the video card match. It should fit. But it doesn't. More often than not, it turns out that the rear metal bracket just won't slide in. Sometimes it's because the tab at the bottom of the video card's rear metal bracket doesn't line up with the matching hole in the baseplate. Other times it won't fit because the rear metal bracket pushes up against the rear of the case and that pushes the video card a little too far forward to fit into the expansion slot. Basically, it's usually something to do with the video card's rear metal bracket. Sometimes you can only solve the problem with pliers or tin snips. But often you can solve the problem by moving the motherboard around a little within the case. You can do that by loosening the little screws which hold the motherboard to the metal baseplate underneath. The blue arrows in the image above point at a couple of those screws. You don't have to remove them. Just unscrew them a little. There are usually four or more of those screws holding down the motherboard. After loosening the screws a little, you can nudge the motherboard around within the case while trying to get the video card to fit into the expansion slot. Sometimes you also have to loosen the screws which hold down other expansion cards or move the retention arm which holds them in place before the motherboard will move. Once it fits and you've inserted it into the expansion slot, you can tighten the motherboard screws again.
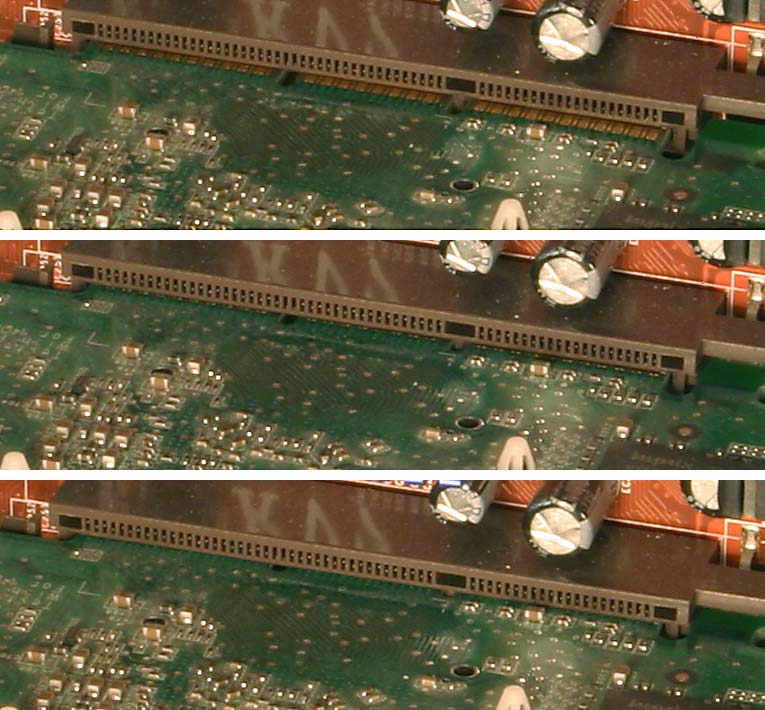
Be sure to push the video card all the way into the slot. You can tell that it's all the way in by seeing that the "golden fingers" on the circuit board are all the way into the expansion slot. One of the most common installation mistakes is not pushing the video card fully into the expansion slot and ending up with a card which seems to be dead. The top image shows a video card with the golden fingers clearly not pushed all the way in. The bottom image shows a card which is pushed in all the way. Whether the card in the middle picture is fully in or needs to be pushed in a little more depends on the video card. The length of the golden fingers varies from card to card so some cards will work fine as seen in the middle image and others will not. The best thing to do is to press the video card firmly into the slot and make sure it won't go any farther in. Some retention mechanisms will click shut when the card is pushed all the way in. Otherwise you'll just have to make sure you've pushed it in all the way.
If your case uses screws to hold the rear of the video card in place then screw it back in. If your case uses a retention arm then push it back into position to clamp it down on the top of the card's rear metal bracket. Some kinds of expansion slot retention mechanisms need to be slid or rotated to lock the front of the video card in place. The common lever type shown in this image should latch automatically when the card is pressed fully into the slot. If not, then pull the lever up a little until it clicks.
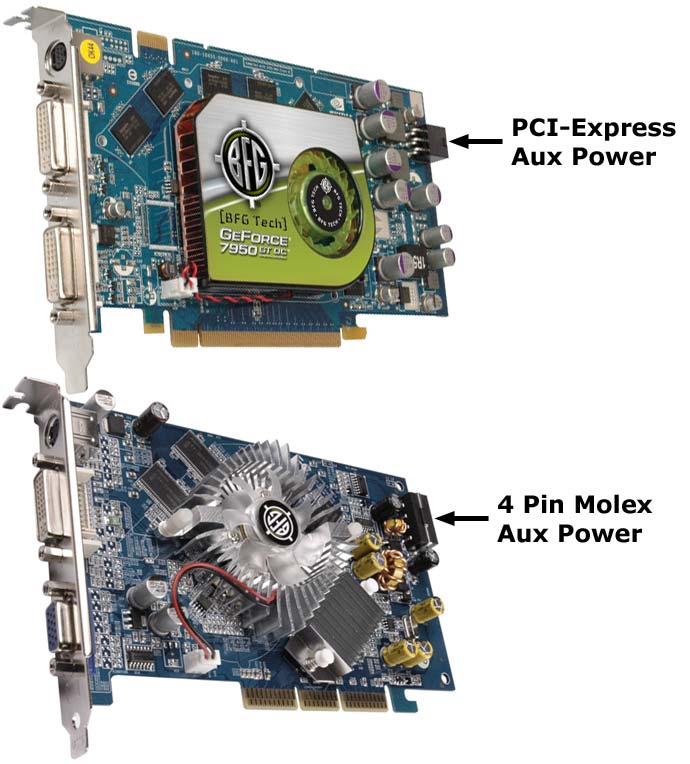
Now you need to connect any auxiliary power cables to the video card. Some video cards draw too much power to get it from the expansion slot. They need one or (yikes!) two power cables to provide enough wattage. If you don't connect the auxiliary power cables then the video cards will give some kind of warning message quite often accompanied by an annoying sound from the speaker. The auxiliary power connector is usually on the front of the video card as seen in this card and the two cards in the image above. Older video cards use a floppy cable or 4 pin peripheral cable for auxiliary power. Newer video cards use a 6 Pin PCI-Express cable. If your video card has an auxiliary power connector then find a matching spare power cable coming from your power supply and plug it in. If you have one of the few video cards which require two auxiliary power cables then be sure to use two separate power cables coming from the power supply. Do not use a single power cable which has two of the connectors you need and plug both of those connectors from the same power cable into the video card. If you do that then your video card has to draw all of its auxiliary current through a single set of wires. If you use power connectors on two separate cables then the current is drawn from two separate sets of wires. That reduces the voltage drop across the wires which can be considerable with high-power video cards. If your video card uses a 4 pin peripheral cable for auxiliary power then be sure not to use any fan-only power cables coming from the power supply. Fan-only cables use the same connector but only have two wires instead of the standard four and they usually have "fan" or "fan only" printed on the connector. Their voltage changes to control the fan speed so you definitely don't want to connect it to your video card even though the connector will fit. If you're putting together a high-powered computer then you may have to be careful which power supply cable you connect to the video card. This page gives more information about the wonderful world of load balancing problems with high-end video cards. Only serious gaming computers normally have to worry about this issue. Everyone else can just pick any power supply cable and hook it up.
If you're an optimist and you're not going to be installing anything else then close the case. I usually leave mine open in case I need to get back in there. It's also nice to make sure that the video card's cooling fan is spinning when you turn it on for the first time. If that fan isn't spinning then you can damage your video card. Plus, leaving the case open makes it easier to connect the auxiliary power connector that you forgot to hook up. I forget to connect them all the time.
Connect the monitor to your video system
Most current video cards have at least two VGA or DVI outputs. You can read in detail about VGA on this page and DVI on this page. All VGA outputs are the same and most video cards don't care which one you use if you have more than one. The video card will sense which one is connected to a monitor and use it automatically. DVI outputs also can sense when a monitor is connected so you can use any DVI output. But DVI can get a bit complicated because different DVI outputs can have different capabilities. It's quite common for one DVI output to be able to support higher resolution monitors than another DVI output. Many video cards have one single link DVI output and one dual link DVI output. You can read more about single and dual link DVI on this page. If you need to use a dual link DVI output and your video card only has one of them then you'll need to consult the video card documentation on which DVI output supports dual link. Both DVI outputs will work with a high resolution monitor at lower resolutions but only the dual link DVI output will be able to drive the monitor at high resolution. The DVI outputs may also differ in speed. One DVI output may use slower DVI transmitters built into the GPU whereas the other DVI output may use a faster external silicon chip. If you have problems with one DVI output then try the other. They're often quite different.
Some LCD monitors have both a VGA input and a DVI input. You only need to connect one or the other. Don't connect cables to both. If you're not sure which one to use then just use DVI. It's digital and may give you better image quality. In my experience, VGA always works whereas DVI almost always works. If DVI doesn't work then try connecting it to the VGA output instead. VGA is a long-established technology whereas DVI still has a few bugs to work out from time to time. It's better in the long run to go with digital (DVI) but it's handy to be able to resort to analog (VGA) if you need to.
Install the display drivers for your video card
This step is pretty easy. All you have to do is boot Windows, locate the display driver installer program for your video card, and run it. Windows can work with your video card with no display drivers installed. It may be limited to a low resolution screen mode which a limited number of colors but that's enough to allow you to install your display drivers. If you would like to take the safest route to installing your display drivers then you should boot Windows in VGA mode (or safe mode if you're not running Windows 2000 or XP). It's rarely necessary to install the drivers in VGA mode but you should try it if you're having problems. This page explains how to boot in VGA mode.
Once you've booted into Windows, you have to run the display driver installer program. The installer will then guide you through the installation. It's usually nothing more than accepting a EULA and then clicking "OK" a few times. After the installation is finished you reboot your machine and you're done. Your new video card probably came with an installation CD. Don't use it. It almost certainly contains outdated drivers. New display drivers have probably been released since the installation CD was manufactured. The best drivers to use are ones which you download from the GPU maker (usually ATI or NVIDIA). This page gives thorough instructions on how to download the best display drivers and install them.
| Random stuff |
|---|